Kernel image processing in NumPy
In this post I will explain how I use NumPy to implement the kernal image processing that is used in Deep Learning and other image processing areas. After reading you will (hopefully) understand (better) how the convolutional in Neural Networks work, how image bluring like in Photoshop might work and how to implement that all in NumPy. To follow the post you need some basic knowledge of Python and NumPy.
Intro
I’m currently watching a course about Deep Learning and reached the chapter about Convolutional Neural Networks (CNN) that are used to classify images. One of the most important features of the CNN are the feature maps that result from various filters applied for example at the beginning of a CNN directly on the classified image. As they can also blur or sharpen images in different ways I assume that they are also used in various software application.
The strange looking black and white output in the image below is what CNN use to detect pattern for classification. I don’t want to go into detail how exactly the CNN work, but you can be sure that there are more weird kernels.
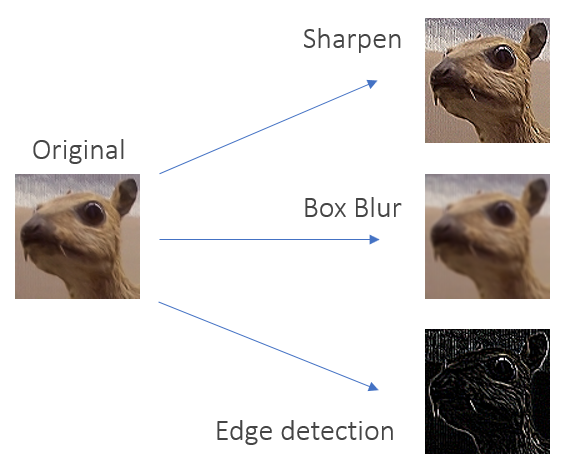 Source: Wikipedia - Kernel (image processing)
What is a convolutional kernel?
To understand what a convolutional kernel is you need to understand what an image actually is. Well, or how a computer sees an image. You know that for a computer an image is simply a rectangle of pixels. Pixels can be expressed as numbers. An rectangle of numbers is a matrix, right?
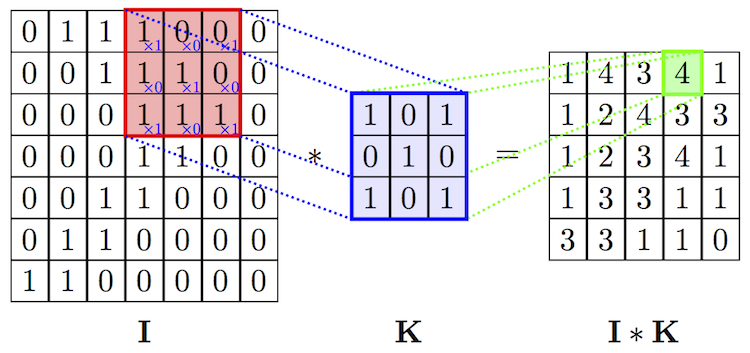
The next image illustrates on the left an image. Every pixel has it’s own number. The kernel is also a matrix, but way smaller. You probably wonder where size of the matrix and it’s numbers are coming from. Depending what you want to achieve with your kernel - sharpening, blurring or detecting edges - you need to choose a special combination of numbers that fit to your goal. Now you probably wonder how just a few numbers can blur an image. Don’t worry you will understand it in a few minutes.
 Source: MINES ParisTech
Now let’s look at the last step in the image. How do I get the 4. The idea is very simple. You put the kernel on the image and multiply the elements of the kernel and the part of the image with each other. Don’t use matrix multiplication. Use the simple multiplication (there is probably a term for it). If you use the data in the image you will get this matrix.
\[\begin{bmatrix} 1 & 0 & 0\\ 0 & 1 & 0\\ 1 & 0 & 1 \end{bmatrix}\]Then you sum up all values, here 1+1+1+1 and put it in a seperate result matrix. And how do I get all the other values. Well, you just move the kernel over the image. How do I move the kernel over the image. The are different ways and some limitation. To simplify the idea, just put the kernel in the top left corner for the start and then move it to the right. How much you move to the right is determined by the number of strides, let’s set this number to one. Once you reach the end of the image you move your kernel down vertically and then start again on the left edge. You do this until you reach the bottom right corner.
If you look at the image and imagine how the kernel is moving over the image you can visualize that the kernel perfectly covers all pixel. But what if the number of strides is not one but two. The kernel will move to a position where it’s numbers don’t overlap with the image number. In this case you need a padding. A padding is like a another row or column in your input matrix. There are different ways to implement a padding. In this post I will not cover it as it is not neccesary to understand the idea behind the kernel processing.
Let’s code
Let us assume that we don’t know how to implement padding, or we just are lazy and don’t want to have it. How can I know that the combination of my kernel and the strides fit to the image, so that we don’t need a padding. There is a formula that can help us.
\[Output_x = \frac{Input_x + 2\cdot Padding_x- Kernel_x}{strides} + 1\]If your image is 100 pixel wide, your kernel has a width of 3 and the strides are set to 1, the width of your output (Output_x) will be 98. This number is not a floating number but an integer. This means that you don’t need a padding in form of columns. You can do the same for the vertical length. If one of the output dimensions is a floating number you need some padding. Technically you could also cut your image so that it fits, but this sounds like cheating. You may also notice that the output is smaller than the input. This means that we will use some information, right? That’s correct but absolutely not a problem for a CNN. Why? That’s complicated and not neccesary here.
Setting Image and Kernel
Ok, let’s implement this in Python. The output of the code cells is written in the comments indicated by #.
The only libraries that you need here are
import numpy as np

from matplotlib.image import imread
import matplotlib.pyplot as plt
With matplotlib we will read images locally or from the internet and then show them.
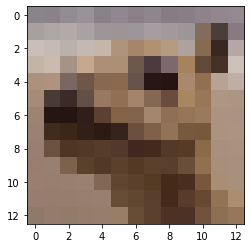
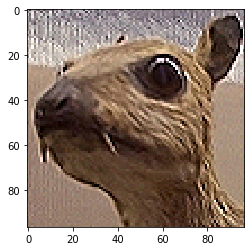
animal = imread('animal_99')
# image source: https://upload.wikimedia.org/wikipedia/commons/5/50/Vd-Orig.png
plt.imshow(animal)
imread(...) outputs an NumPy array that contains all pixels of the image.
How big is this image?
animal.shape
# (99, 99, 3)
The output tells us that the image is 99 pixel wide, 99 pixel long. The 3 shows us the 3rd dimension - the color dimension. The image is not a black/white image. Each pixel contains information about the three color channels red, green, blue. For a black/white images the output of the shape would be simply (99, 99).
There is a small difference between the animal_99.png and the original image from the wikipedia article: the original has a size of 100x100, with kernels of the size 3x3 that image would only allow us to use a stride of 1 or 97, with a 99x99 image we have more options like 1, 2, 3, 4, 6, 8, 12, etc.
We can also look at each pixel seperately. This is the pixel in the top left corner.
animal[0, 0, :3]
# array([0.5176471, 0.5137255, 0.5372549], dtype=float32)
The colors in the channel can be expressed either on the scale from 0 to 255, where you can only use integers, or 0 to 1, where you can obviously also use floating numbers. Matplotlib will also take care if the numbers are out of the scale and the normalize them.
Our kernels are also NumPy arrays.
kernel_blur = np.ones((3,3)) * (1/9)
kernel_blur
# array([[0.11111111, 0.11111111, 0.11111111],
#       [0.11111111, 0.11111111, 0.11111111],
#       [0.11111111, 0.11111111, 0.11111111]])
np.ones() return a array full of ones, the tupel (3,3) gives the array the width of 3 and the length of 3.
This might help you to understand how a kernel can blur a image. Every single pixel in the final output is a combination of the 9 pixels from the input image that are covered by the kernel matrix. Look back at the first image in the blog post. Using ‘kernel_blur’ the green number in the output matrix will be equal to 6 * 1/9 = 0.66. In the red square you can clearly identify where the ones and zeros are, after the blurring kernel all you see is a 0.66. The input is blurred.
Now we should be able to write the code for the formula that shows us first the size of the output matrix and by this also if the kernel fits the input image without padding. The functions needs to know the image, the kernel and the stride that we choose. Then you can simply hardcode the formula as given. In the last line we also check if both, the width x and length y are integers. For further functions we will also need the output sizes.
def kernel_fits(image, kernel, stride):
    output_x = (image.shape[0] - kernel.shape[0])/stride +1
    output_y = (image.shape[1] - kernel.shape[1])/stride +1
    return (output_x, output_y, (output_x.is_integer() and output_y.is_integer()))
Move the Kernel over the Image
The heart of the code is the convolutional function that moves the kernel over the image, applies the calculations and outputs a new output matrix.
In our main functions that takes the same arguments as the kernel_fits function first use kernel_fits to check if the kernel fits and then use it to create an empty output array.
def conv(image, kernel, stride):
    # check if kernel fits image without padding
    if kernel_fits(image, kernel, stride)[2]:
        # create output array, here 3d
        output = np.zeros((int(kernel_fits(image, kernel, stride)[0]), int(kernel_fits(image, kernel, stride)[1]), 3))
    else:
        print("Kernel does not fit image without padding")
np.zeros(), similar to np.ones(), returns a multidimensional array full of zeros, the argument is a tuble with the sizes of the dimensions (width, length, depth). Width and length are obviously the outputs of the formula that we use and depth is the number of the color channels - 3. As the function takes only integers as input we prepare them with int().
The hard part lies ahead of us. Let’s simplify the idea and compute only the first value of the output matrix.
output[0, 0, 0] = np.sum(image[0:3, 0:3, 0] * kernel)
image[0:3, 0:3, 0] * kernel multiplies the input with the kernel, np.sum() creates a sum of all the values. Now let’s move the kernel to the right. The 3 comes from the kernel size.
output[1, 0, 0] = np.sum(image[1:4, 1:4, 0] * kernel)
How exactly does movement work, output moves always one-step wise, the kernel’s movement depends on stride. We need to generelize the functions, not every kernel has the size 3x3 and stride is not fixed.
def conv(image, kernel, stride):

    # check if kernel fits image without padding
    if kernel_fits(image, kernel, stride)[2]:

        # create output array, here 3d
        output = np.zeros((int(kernel_fits(image, kernel, stride)[0]), int(kernel_fits(image, kernel, stride)[1]), 3))

        # starting points of process
        output_x = 0
        output_y = 0
        start_x = 0
        start_y = 0
        end_x = kernel.shape[0]
        end_y = kernel.shape[1]
        stride_x = stride
        stride_y = stride

        output[output_x, output_y, 0] = np.sum(image[start_x:end_x, start_y:end_y, 0] * kernel)
output_x and output_y are the positions of the output. The kernel has also a position, as we start from the top left corner we set the kernel top left corner to 0 and 0.
Now we can make a loop that moves the kernel horizontally.
# loop over x-dimension (horizontal)
while end_x <= image.shape[0]:

    # add kernel sum to output
    output[output_x, output_y, 0] = np.sum(image[start_x:end_x, start_y:end_y, 0] * kernel)

    # move kernel horizontally
    output_x += 1
    start_x += stride_x
    end_x += stride_x
The loop moves the kernel to the right edge, after the output is computed we move the output to the next position by a step and the kernel by stride_x.
What do we do after the loop is finished. We have to move the kernel vertically and start over again. This is done is a second loop.
# loop over y-dimension (vertical)
while end_y <= image.shape[1]

    # ... previous loop

    # reset hozintal movement
        output_x = 0
        start_x = 0
        end_x = kernel.shape[0]

    # move kernel vertically
        output_y += 1
        start_y += stride_y
        end_y += stride_y
We reset all horinzontal positions but go vertically down.
After this loop is done, the kernel has moved from the top left corner to the bottom right corner of the image. Are we done? Not yet what about the depth of the image? The image has three color channels.
In my first draft I created another loop for the third dimension. The better solution is probably to compute all three color channels at the same time.
# add kernel sum to output
output[output_x, output_y, 0] = np.sum(image[start_x:end_x, start_y:end_y, 0] * kernel)
output[output_x, output_y, 1] = np.sum(image[start_x:end_x, start_y:end_y, 1] * kernel)
output[output_x, output_y, 2] = np.sum(image[start_x:end_x, start_y:end_y, 2] * kernel)
The last missing part is the return of the output.
Here is now the complete function:
def conv(image, kernel, stride):

    # check if kernel fits image without padding
    if kernel_fits(image, kernel, stride)[2]:

        # create output array, here 3d
        output = np.zeros((int(kernel_fits(image, kernel, stride)[0]), int(kernel_fits(image, kernel, stride)[1]), 3))

        # starting points of process
        output_x = 0
        output_y = 0
        start_x = 0
        start_y = 0
        end_x = kernel.shape[0]
        end_y = kernel.shape[1]
        stride_x = stride
        stride_y = stride

        # loop over y-dimension (vertical)
        while end_y <= image.shape[1]:

            # loop over x-dimension (horizontal)
            while end_x <= image.shape[0]:

                # add kernel sum to output
                output[output_x, output_y, 0] = np.sum(image[start_x:end_x, start_y:end_y, 0] * kernel)
                output[output_x, output_y, 1] = np.sum(image[start_x:end_x, start_y:end_y, 1] * kernel)
                output[output_x, output_y, 2] = np.sum(image[start_x:end_x, start_y:end_y, 2] * kernel)

                # move kernel horizontally
                output_x += 1
                start_x += stride_x
                end_x += stride_x

            # reset hozintal movement
            output_x = 0
            start_x = 0
            end_x = kernel.shape[0]

            # move kernel vertically
            output_y += 1
            start_y += stride_y
            end_y += stride_y

        return output

    else:
        print("Kernel does not fit image without padding")
Additionally we can create more kernels:
kernel_sharp = np.array([[0, -1, 0],
                 [-1, 5, -1],
                 [0, -1, 0]])

kernel_edge = np.array([[-1, -1, -1],
                  [-1, 8, -1],
                  [-1, -1, -1]])
We can now apply any kernel or any image. Let’s stay with the animal image as we can verify the output with the wikipedia page.
plt.imshow(conv(animal, kernel_sharp, 1))
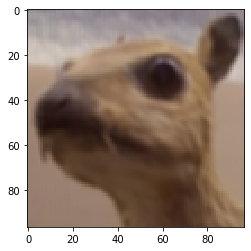
As promised we can also increase stride.
plt.imshow(conv(animal, kernel_blur, 8))